
Yoga found me at the start of my time being associated with the military. It has been one of the pillars of self-care for me over the seven years I have been around the military. These poses are the ones that I repeatedly return to. They have seen me through long distance dating, Officer Candidate School, PCS, deployment with an extension and COVID, an overseas PCS and through our time overseas including a nine month extension on orders.
Here are 5 yoga poses every military spouse needs:
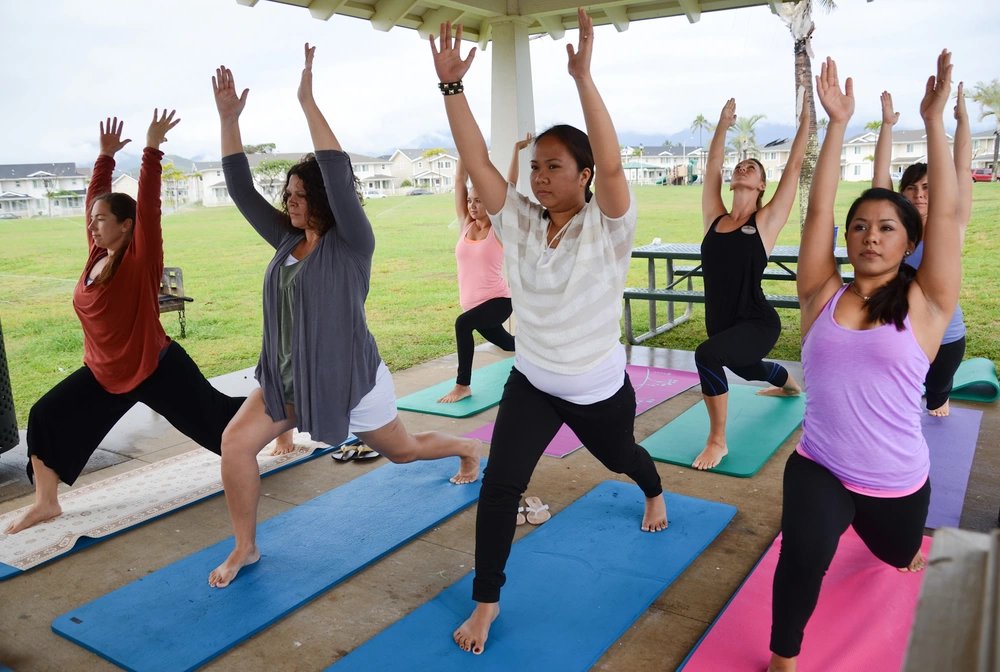
1. Warrior II

For the days when you feel defeated, deployment blues wear you down, PCS stress is to a max this power pose gives you the strength to keep going. Start in a neutral standing position, feet hip distance apart. Step your left leg behind you as if you’re going to a lunge, then spin your heel down making your foot parallel with the short edge of mat, point your right toes to the other short end of the mat, a slight bend in the right knee. Open your arms to T shape, and turn your head so your gaze goes over your right finger tips. Lengthen through your spine, allow your shoulders to fall away from your ears.
2. Downward Facing Dog

When I’m getting caught in my head I love a good inversion. Moving the head below the heart gives a physical perspective change that helps to move emotions through the body. To get into this posture start in a standing posture and hinge forward from your hips reaching for your toes. Plant your hands firmly on the mat and step your feet back one at a time moving to a plank pose. From plank pose push your hips up and back towards where the wall meets the ceiling. Arms long and strong, spine straight, bend your knees as much as you need, and reach your heels for the floor, they do not need to touch.
3. Child’s Pose

For those moments when you are weary, take a moment to surrender in child’s pose. This can be done on the floor or on a bed. Starting on hands and knees bring your big toes to touch and take your knees wide, sit your hips back on your heels, and walk your hands out in front of you until your forehead rests on the floor. You can stay here for a few breaths, or if you want to hold the pose for longer you can make yourself comfy by sliding some pillows or a bolster under your chest to offer a bit more support. If your knees are sensitive fold a blanket up and put it under your knees before getting into the posture. If your hips are tight and too high up you can slip a blanket or some pillows behind your knees.
For these next three poses you will need a few props; two or three blocks and a bolster. If you do not have blocks or a bolster, a stack of pillows and a blanket or two will work. In restorative postures the goal is rest, so allow the props to support your body and stay in these postures for at least five minutes, allowing your body to enter into a restful state.
4. Supported Fish

For this posture you just need one or two blocks, or a blanket that can be rolled up. For the blocks, make a T shape with them, placing one long ways and the second one you will place perpendicular to and lower than the first block. Next, sitting on your bottom, line your body up so that the base of your bra line or base of your shoulder blade is at the bottom of the T, laying your spine over the block and then allowing your head to drop and rest on the top block. You may need to adjust placement of the blocks so that your body can comfortable rest over them. You can keep a bend in your knees with your feet on the floor or stretch your legs out long. Keeping your knees bent will make it less intense, legs long more intense. If you do not have blocks, take a blanket and roll it then lay it out so you can place your spine on it. Lay your body over the blanket so that your head can hang of the top of the blanket.
5. Reclined Bound Angle

I saved the best posture for last. This posture is deeply restful, opening the heart and the hips. You will need two to three blocks and a bolster. Lay your bolster with the long edge of your mat, you will be resting your spine along the bolster, if you are pregnant or prone to heartburn you may want to elevate the top of the bolster using a block, a pillow or a blanket. Place your low back against the bottom of the bolster. Bring the soles of your feet together making a diamond shape with your legs and then place a block under each knee. Recline back onto the bolster, adjust your legs until you find a comfortable placement for them with the blocks. If you do not have blocks using a few towels rolled or folded up or pillows in place blocks, the goal is to have your knees supported in the diamond shape. Once you are in your comfortable position, rest. Allow your body to fully sink into the props and support your body. There should be no effort exerted in this posture.